Vous n'êtes pas identifié.
Pages: 1
- Accueil forums
- » Technique & Optimisation
- » [FSX] Directx 10, ENB Series, reglage carte graphique !!!
#1 [↑][↓] 23-08-2013 19:59:48

[FSX] Directx 10, ENB Series, reglage carte graphique !!!
Bonjour à tous
voila je me suis lancer à mettre DX 10 dans fsx, ouffff le changement radicale fps qui grimpe belle couleur etc, top.
sauf que voila j'ai des petite question à vous poser:
1/ Depuis que je suis passer en DX 10, je n'ais plus la possibilité d'activer ENB Series, pourquoi ? je ne sais pas du tout 
2/ Comment régler la carte graphique via nvidia inspector, j'avais fait les réglage de jacky brouze avant parfait maintenant sa n'a aucun effet
3/ J'ai également des problèmes de couleurs, des voiture blanches, certain avion blanc etc
ce qui est dommage c'est que le rendu me plait vraiment donc j'aimerais bien trouver les solution,
mais je sèche :(
jespère que vous pouvez m'aider
d'avance merci beaucoup et bon vol !!!
Hors ligne
#2 [↑][↓] 23-08-2013 21:20:32
- Daube
- Pilote Virtuel

- Date d'inscription: 31-10-2008
Re: [FSX] Directx 10, ENB Series, reglage carte graphique !!!
L'ENB ne fonctionne qu'en mode DirectX9, uniquement.
Pour le DirectX10, tu peux peut-etre utiliser sweetFX ? (je connais pas trop bien...)
Core i7 8700k, 32 Gb de RAM, NVidia GTX 1070-ti, Windows 10 64, Casque VR Pico 4
Hors ligne
#3 [↑][↓] 24-08-2013 10:19:31

Re: [FSX] Directx 10, ENB Series, reglage carte graphique !!!
Je confirme ce que dit Daube: ENB pas compatible Direct X 10.
Pour les réglages Nvidia Inspector en Direct X 10, il y a des tas de réponses dans cette rubrique, même en épinglé, il te suffit de regarder quelques lignes au-dessus de ton propre post.
Les textures blanches (avions, autres véhicules, immeubles d'aéroports, etc....) il s'agit de textures non compatibles Dx 10, il existe quelques softs qui prétendent les rendre compatibles mais, ils sont la plupart du temps en grande partie inefficaces.
Je suis sous Dx 10 depuis plus d'un an et les quelques (très peu) inconvénients sont plus que largement compensés par les améliorations (très nombreuses) apportées.
Comme tu as déjà pu le constater par toi même!
Bons vols Dx 10 à toi.
Hors ligne
#4 [↑][↓] 24-08-2013 11:23:26
Re: [FSX] Directx 10, ENB Series, reglage carte graphique !!!
bonjour merci pour vos réponse c'est gentil à vous
Donc si j'ai bien compris il n'y a pas de solution pour l'instant,
Daube à quoi correspond sweet FX ?
merci encore
Hors ligne
#5 [↑][↓] 24-08-2013 12:07:02
Re: [FSX] Directx 10, ENB Series, reglage carte graphique !!!
Bonjour,
voici un élément de réponse
On en parle ici même
Dernière modification par panchoka (24-08-2013 12:09:32)
Aorus Pro, I9 9900K, 32Go DDR4, SSD M2 256Go SSD M2 500Go, GTX 2080Ti, win10 Pro 64, ecran 27" 120hz, track ir 5, Rudder et throttle Saitek, Joy FFB2, Buttckiker gamer 2, valve index
Hors ligne
#6 [↑][↓] 25-08-2013 11:11:53

Re: [FSX] Directx 10, ENB Series, reglage carte graphique !!!
En DX9 ou DX10, SweetFX est pour moi préférable a ENB, et est plus simple à régler, en plus de marcher aussi en DX10.
Entre autres il enlève le voile blanchâtre omniprésent dans FSX, pour cela que certain l'utilisent en plus de ENB.
ENB fait, pour moi, qlq soit les réglages des bloom moches et pas réalistes, avec des couleurs saturées vilaines. En m'acharnant j'arrive a un truc bien pour un moment de la journée, mais pas pour un autre.
Sweet FX avec le bon réglage est par contre discret et indispensable. Avec une nuit plus nuit, et un jour plus jour. Mais peut lui-aussi faire des blooms dégueulasses et des couleurs saturées kitchouilles si on veux...
Mon réglage, pour du DX10, possible qu'il y est un soucis de saut de ligne avec le forum :
Attention c'est long, et sans doute imparfait, pour l'instant c'est ce que j'ai de plus équilibré, si vous avez mieux je prend.
/*-----------------------------------------------------------.
/ Choose effects /
'-----------------------------------------------------------*/
// Set to 1 for ON or 0 for OFF
#define USE_SMAA_ANTIALIASING 0 // [0 or 1] SMAA Anti-aliasing : Smoothens jagged lines using
//the SMAA technique.
#define USE_FXAA_ANTIALIASING 0 // [0 or 1] FXAA Anti-aliasing : Smoothens jagged lines using
//the FXAA technique. WIP - Currently only works in DX9 and you need to use the FXAA injector dlls.
#define USE_CARTOON 0 // [0 or 1] Cartoon : "Toon"s the image. (Interferes with SMAA, CRT,
//Bloom, HDR and Lumasharpen)
#define USE_ADVANCED_CRT 0 // [0 or 1] Advanced CRT : Simulates an old CRT TV display.
//(Interferes with SMAA, Cartoon, Bloom, HDR and Lumasharpen, and it has a very high performance cost)
#define USE_BLOOM 0 // [0 or 1] Bloom : Makes bright lights bleed their light into their
//surroundings (relatively high performance cost)
#define USE_HDR 0 // [0 or 1] HDR : Not actual HDR - It just tries to mimic an HDR look
//(relatively high performance cost)
#define USE_LUMASHARPEN 1 // [0 or 1] LumaSharpen : Also sharpens the antialiased edges
//which makes them less smooth - I'm working on fixing that.
#define USE_TECHNICOLOR 0 // [0 or 1] TECHNICOLOR : Attempts to mimic the look of an old
//movie using the Technicolor three-strip color process (Techicolor Process 4)
#define USE_DPX 0 // [0 or 1] Cineon DPX : Should make the image look like it's been
//converted to DXP Cineon - basically it's another movie-like look similar to technicolor.
#define USE_MONOCHROME 0 // [0 or 1] Monochrome : Monochrome makes the colors
//disappear.
#define USE_LIFTGAMMAGAIN 0 // [0 or 1] Lift Gamma Gain : Adjust brightness and color of
//shadows, midtones and highlights (avoids clipping)
#define USE_TONEMAP 0 // [0 or 1] Tonemap : Adjust gamma, exposure, saturation, bleach
//and defog. (may cause clipping)
#define USE_VIBRANCE 1 // [0 or 1] Vibrance : Intelligently saturates (or desaturates if you use
//negative values) the pixels depending on their original saturation.
#define USE_CURVES 1 // [0 or 1] Curves : Contrast adjustments using S-curves.
#define USE_SEPIA 0 // [0 or 1] Sepia : Sepia tones the image.
#define USE_VIGNETTE 0 // [0 or 1] Vignette : Darkens the edges of the image to make it look
//more like it was shot with a camera lens. May cause banding artifacts.
#define USE_DITHER 0 // [0 or 1] Dither : Applies dithering to simulate more colors than your
//monitor can display. This lessens banding artifacts (mostly caused by Vignette)
#define USE_BORDER 0 // [0 or 1] Border : Makes the screenedge black as a workaround for
//the bright edge that forcing some AA modes sometimes causes.
#define USE_SPLITSCREEN 0 // [0 or 1] Splitscreen : Enables the before-and-after splitscreen
//comparison mode.
/*-----------------------------------------------------------.
/ SMAA Anti-aliasing settings /
'-----------------------------------------------------------*/
#define SMAA_THRESHOLD 0.2 // [0.05 to 0.20] Edge detection threshold. If SMAA misses some
////edges try lowering this slightly. I prefer between 0.08 and 0.12.
#define SMAA_MAX_SEARCH_STEPS 98 // [0 to 98] Determines the radius SMAA will search for
////aliased edges
#define SMAA_MAX_SEARCH_STEPS_DIAG 16 // [0 to 16] Determines the radius SMAA will search
////for diagonal aliased edges
#define SMAA_CORNER_ROUNDING 50 // [0 to 100] Determines the percent of antialiasing to apply
////to corners. 0 seems to affect fine text the least so it's the default.
// -- Advanced SMAA settings --
#define COLOR_EDGE_DETECTION 1 // [0 or 1] 1 Enables color edge detection (slower but slightly
////more acurate) - 0 uses luma edge detection (faster)
#define SMAA_DIRECTX9_LINEAR_BLEND 0 // [0 or 1] Using DX9 HARDWARE? (software version
////doesn't matter) if so this needs to be 1 - If not, leave it at 0.
//Enable this only if you use a Geforce 7xxx series or older card, or a Radeon X1xxx
////series or older card.
/*-----------------------------------------------------------.
/ FXAA Anti-aliasing settings /
'-----------------------------------------------------------*/
#define FXAA_QUALITY__PRESET 9 // [1 to 9] Choose the quality preset. 9 is the highest quality.
#define fxaa_Subpix 0.400 // [0.000 to 1.000] Choose the amount of sub-pixel aliasing removal.
#define fxaa_EdgeThreshold 0.250 // [0.000 to 1.000] Edge detection threshold. The minimum amount
////of local contrast required to apply algorithm.
#define fxaa_EdgeThresholdMin 0.060 // [0.000 to 1.000] Darkness threshold. Trims the algorithm from
////processing darks.
/*-----------------------------------------------------------.
/ Cartoon settings /
'-----------------------------------------------------------*/
#define CartoonPower 1.0 // [0.1 to 10.0] Amount of effect you want.
/*-----------------------------------------------------------.
/ Advanced CRT settings /
'----------------------------------------------------------*/
#define CRTAmount 1.00 // [0.00 to 1.00] Amount of CRT effect you want
#define CRTResolution 1.2 // [1.0 to 8.O] Input size coefficent (low values gives the "low-res retro
////look"). Default is 1.2
#define CRTgamma 2.4 // [0.0 to 4.0] Gamma of simulated CRT (default 2.4)
#define CRTmonitorgamma 2.2 // [0.0 to 4.0] Gamma of display monitor (typically 2.2 is correct)
#define CRTBrightness 1.0 // [1.0 to 3.0] Used to boost brightness a little. Default is 1.0
#define CRTScanlineIntensity 2.0 // [2.0 to 4.0] Scanlines intensity (use integer values preferably).
//Default is 2.0
#define CRTScanlineGaussian 1 // [0 or 1] Use the "new nongaussian scanlines bloom effect".
//Default is on
#define CRTCurvature 1 // [[0 or 1] "Barrel effect" enabled (1) or off (0)
#define CRTCurvatureRadius 1.5 // [0.0 to 2.0] Curvature Radius (only effective when Curvature is
//enabled). Default is 1.5
#define CRTCornerSize 0.0010 // [0.0000 to 0.0020] Higher values, more rounded corner. Default is
//0.001
#define CRTDistance 2.00 // [0.00 to 4.00] Simulated distance from viewer to monitor. Default is
//2.00
#define CRTAngleX 0.00 // [-0.20 to 0.20] Tilt angle in radians (X coordinates)
#define CRTAngleY -0.10 // [-0.20 to 0.20] Tilt angle in radians (Y coordinates). (Value of -0.15
//gives the 'arcade tilt' look)
#define CRTOverScan 1.01 // [1.00 to 1.10] Overscan (e.g. 1.02 for 2% overscan). Default is 1.01
#define CRTOversample 0 // [0 or 1] Enable 3x oversampling of the beam profile (warning :
//performance hit)
/*-----------------------------------------------------------.
/ Bloom settings /
'-----------------------------------------------------------*/
#define BloomThreshold 20.25 // [0.00 to 50.00] Threshold for what is a bright light (that causes
//bloom) and what isn't.
#define BloomPower 1.100 // [0.000 to 8.000] Strength of the bloom
#define BloomWidth 0.0142 // [0.0000 to 1.0000] Width of the bloom
/*-----------------------------------------------------------.
/ HDR settings /
'-----------------------------------------------------------*/
#define HDRPower 1.0 // [0.00 to 8.00] Strangely lowering this makes the image brighter
#define radius2 0.79 // [0.00 to 8.00] Raising this seems to make the effect stronger and also
//brighter
/*-----------------------------------------------------------.
/ LumaSharpen settings /
'-----------------------------------------------------------*/
// -- Sharpening --
#define sharp_strength 0.50 // [0.10 to 3.00] Strength of the sharpening
#define sharp_clamp 0.025 // [0.000 to 1.000] Limits maximum amount of sharpening a pixel
//recieves - Default is 0.035
// -- Advanced sharpening settings --
#define pattern 4 // [1|2|3|4] Choose a sample pattern. 1 = Fast, 2 = Normal, 3 = Wider, 4 =
//Pyramid shaped.
#define offset_bias 1.0 // [0.0 to 6.0] Offset bias adjusts the radius of the sampling pattern.
//I designed the pattern for offset_bias 1.0, but feel free to experiment.
// -- Debug sharpening settings --
#define show_sharpen 0 // [0 or 1] Visualize the strength of the sharpen (multiplied by 4 to see it
//better)
/*-----------------------------------------------------------.
/ TECHNICOLOR settings /
'-----------------------------------------------------------*/
#define TechniAmount 0.11 // [0.00 to 1.00]
#define TechniPower 2.8 // [0.00 to 8.00]
#define redNegativeAmount 0.88 // [0.00 to 1.00]
#define greenNegativeAmount 0.88 // [0.00 to 1.00]
#define blueNegativeAmount 0.88 // [0.00 to 1.00]
/*-----------------------------------------------------------.
/ Cineon DPX settings /
'-----------------------------------------------------------*/
#define Red 5.5 // [1.0 to 15.0]
#define Green 9.4 // [1.0 to 15.0]
#define Blue 7.0 // [1.0 to 15.0]
#define ColorGamma 2.7 // [0.1 to 2.5] Adjusts the colorfulness of the effect in a manner similar
//to Vibrance. 1.0 is neutral.
#define DPXSaturation 3.0 // [0.0 to 8.0] Adjust saturation of the effect. 1.0 is neutral.
#define RedC 0.40 // [0.60 to 0.20]
#define GreenC 0.33 // [0.60 to 0.20]
#define BlueC 0.35 // [0.60 to 0.20]
#define Blend 0.4 // [0.00 to 1.00] How strong the effect should be.
/*-----------------------------------------------------------.
/ Monochrome settings /
'-----------------------------------------------------------*/
#define Monochrome_conversion_values float3(0.18,0.41,0.41) // [0.00 to 1.00] Percentage of RGB to
//include (should sum up to 1.00)
/*-----------------------------------------------------------.
/ Lift Gamma Gain settings /
'-----------------------------------------------------------*/
#define RGB_Lift float3(0.920, 0.919, 0.920) // [0.000 to 2.000] Adjust shadows for Red, Green and
//Blue
#define RGB_Gamma float3(0.940, 0.939, 0.940) // [0.000 to 2.000] Adjust midtones for Red, Green
//and Blue
#define RGB_Gain float3(1.000, 0.998, 1.00) // [0.000 to 2.000] Adjust highlights for Red, Green and
//Blue
/*-----------------------------------------------------------.
/ Tonemap settings /
'-----------------------------------------------------------*/
#define Gamma 1.0 // [0.000 to 2.000] Adjust midtones
#define Exposure 0.00 // [-1.000 to 1.000] Adjust exposure
#define Saturation 0.0 // [-1.000 to 1.000] Adjust saturation
#define Bleach 0.00 // [0.000 to 1.000] Brightens the shadows and fades the colors
#define Defog 0.000 // [0.000 to 1.000] How much of the color tint to remove
#define FogColor float3(0.00, 0.00, 2.55) // [0.00 to 2.55, 0.00 to 2.55, 0.00 to 2.55] What color to
//remove - default is blue
/*-----------------------------------------------------------.
/ Vibrance settings /
'-----------------------------------------------------------*/
#define Vibrance 0.05 // [-1.00 to 1.00] Intelligently saturates (or desaturates if you use negative
//values) the pixels depending on their original saturation.
/*-----------------------------------------------------------.
/ Curves settings /
'-----------------------------------------------------------*/
#define Curves_mode 0 // [0|1|2] Choose what to apply contrast to. 0 = Luma, 1 = Chroma, 2 =
//both Luma and Chroma. Default is 0 (Luma)
#define Curves_contrast 0.30 // [-1.00 to 1.00] The amount of contrast you want
// -- Advanced curve settings --
#define Curves_formula 7 // [1|2|3|4|5|6|7|8|9] The contrast s-curve you want to use.
//1 = Sine, 2 = Abs split, 3 = Smoothstep, 4 = Exp formula, 5 = Simplified Catmull-Rom
//(0,0,1,1), 6 = Perlins Smootherstep
//7 = Abs add, 8 = Techicolor Cinestyle, 9 = Parabola.
//Note that Technicolor Cinestyle is practically identical to Sine, but runs slower. In fact I think
//the difference might only be due to rounding errors.
//I prefer 2 myself, but 3 is a nice alternative with a little more effect (but harsher on the
//highlight and shadows) and it's the fastest formula.
/*-----------------------------------------------------------.
/ Sepia settings /
'-----------------------------------------------------------*/
#define ColorTone float3(1.30, 1.10, 0.90) // [0.00 to 2.55, 0.00 to 2.55, 0.00 to 2.55] What color to tint
//the image
#define GreyPower 0.11 // [0.00 to 1.00] How much desaturate the image before tinting it
#define SepiaPower 0.2 // [0.00 to 1.00] How much to tint the image
/*-----------------------------------------------------------.
/ Vignette settings /
'-----------------------------------------------------------*/
#define VignetteRatio 1.00 // [0.15 to 6.00] Sets a width to height ratio. 1.00 (1/1) is perfectly round,
//while 1.60 (16/10) is 60 % wider than it's high.
#define VignetteRadius 1.00 // [-1.00 to 3.00] lower values = stronger radial effect from center
#define VignetteAmount -1.00 // [-2.00 to 1.00] Strength of black. -2.00 = Max Black, 1.00 = Max
//White.
#define VignetteSlope 8 // [1 to 16] How far away from the center the change should start to
//really grow strong (odd numbers cause a larger fps drop than even numbers)
#define VignetteCenter float2(0.500, 0.500) // [0.000 to 1.000, 0.000 to 1.000] Center of effect.
/*-----------------------------------------------------------.
/ Dither settings /
'-----------------------------------------------------------*/
#define dither_method 1 // [1 or 2] 1 = Ordering dithering (good and very fast), 2 = Random
//dithering (even better dithering but not as fast)
//Note that the patterns used by Dither, makes an image harder to compress.
//This can make your screenshots and video recordings take up more space.
/*-----------------------------------------------------------.
/ Border settings /
'-----------------------------------------------------------*/
//No settings yet, beyond switching it on or off in the top section.
/*-----------------------------------------------------------.
/ Splitscreen settings /
'-----------------------------------------------------------*/
#define splitscreen_mode 1 // [1|2|3|4|5] 1 = Vertical 50/50 split, 2 = Vertical 25/50/25 split, 3 =
//Vertical 50/50 angled split, 4 = Horizontal 50/50 split, 5 = Horizontal 25/50/25 split
Dernière modification par happening (25-08-2013 21:02:54)
Hors ligne
#7 [↑][↓] 25-08-2013 19:23:22
- Nirgal76
- Commandant de bord
- Date d'inscription: 15-01-2009
Re: [FSX] Directx 10, ENB Series, reglage carte graphique !!!
Je ne connaissais pas sweetfx, merci pour l'info !
Hors ligne
#8 [↑][↓] 26-08-2013 11:53:34
Re: [FSX] Directx 10, ENB Series, reglage carte graphique !!!
Bonjour merci pour l'astuce Happening, je viens de le faire effectivement c'est parfait comme sa.
Maintenant est-il possible de régler l'antialiasing par nvidia inspector ou autre ? car je fait mes réglage mais Fsx ne prend pas en compte
Merci encore
Hors ligne
#9 [↑][↓] 26-08-2013 16:20:48
Re: [FSX] Directx 10, ENB Series, reglage carte graphique !!!
Et bien, perso l'antialias par le nvidia inspector marche chez moi - en tout cas je n'ai rien de crénelé visuellement.
Il est possible qu'il faille décocher l'antialias dans les options FSX, perso c'est décoché.
Je suis aussi en anisotropique dans les options FSX et en DX10, dès fois que cela est un lien.
Sinon dans les réglages de sweet FX il y a un réglage USE_FXAA_ANTIALIASING, ici désactivé. J'avoue ne pas avoir testé cette piste, pensant que le réglage par nvidia sera toujours moins gourmand - mais on est pas une aberration près.
Hors ligne
#10 [↑][↓] 27-08-2013 11:27:06
Re: [FSX] Directx 10, ENB Series, reglage carte graphique !!!
Bonjour merci pour le coup de main j'ai fait le réglage et c'est encore un petit peu créneler je comprend pas, mais bon c'est pas moche comme sa donc parfait.
Par contre un autre point depuis que je suis passer en DX10 les nuages me bouffe plus des FPS qu'avant bizarre sa aussi si vous avez des astuce pour sa je prend :)
merci d'avance et bon vol !!!
Hors ligne
#11 [↑][↓] 27-08-2013 12:50:47
- Nirgal76
- Commandant de bord
- Date d'inscription: 15-01-2009
Re: [FSX] Directx 10, ENB Series, reglage carte graphique !!!
Idem, pas vraiment de crénelage en DX10 grâce à nvidia inspector
- C'est coché dans fsx
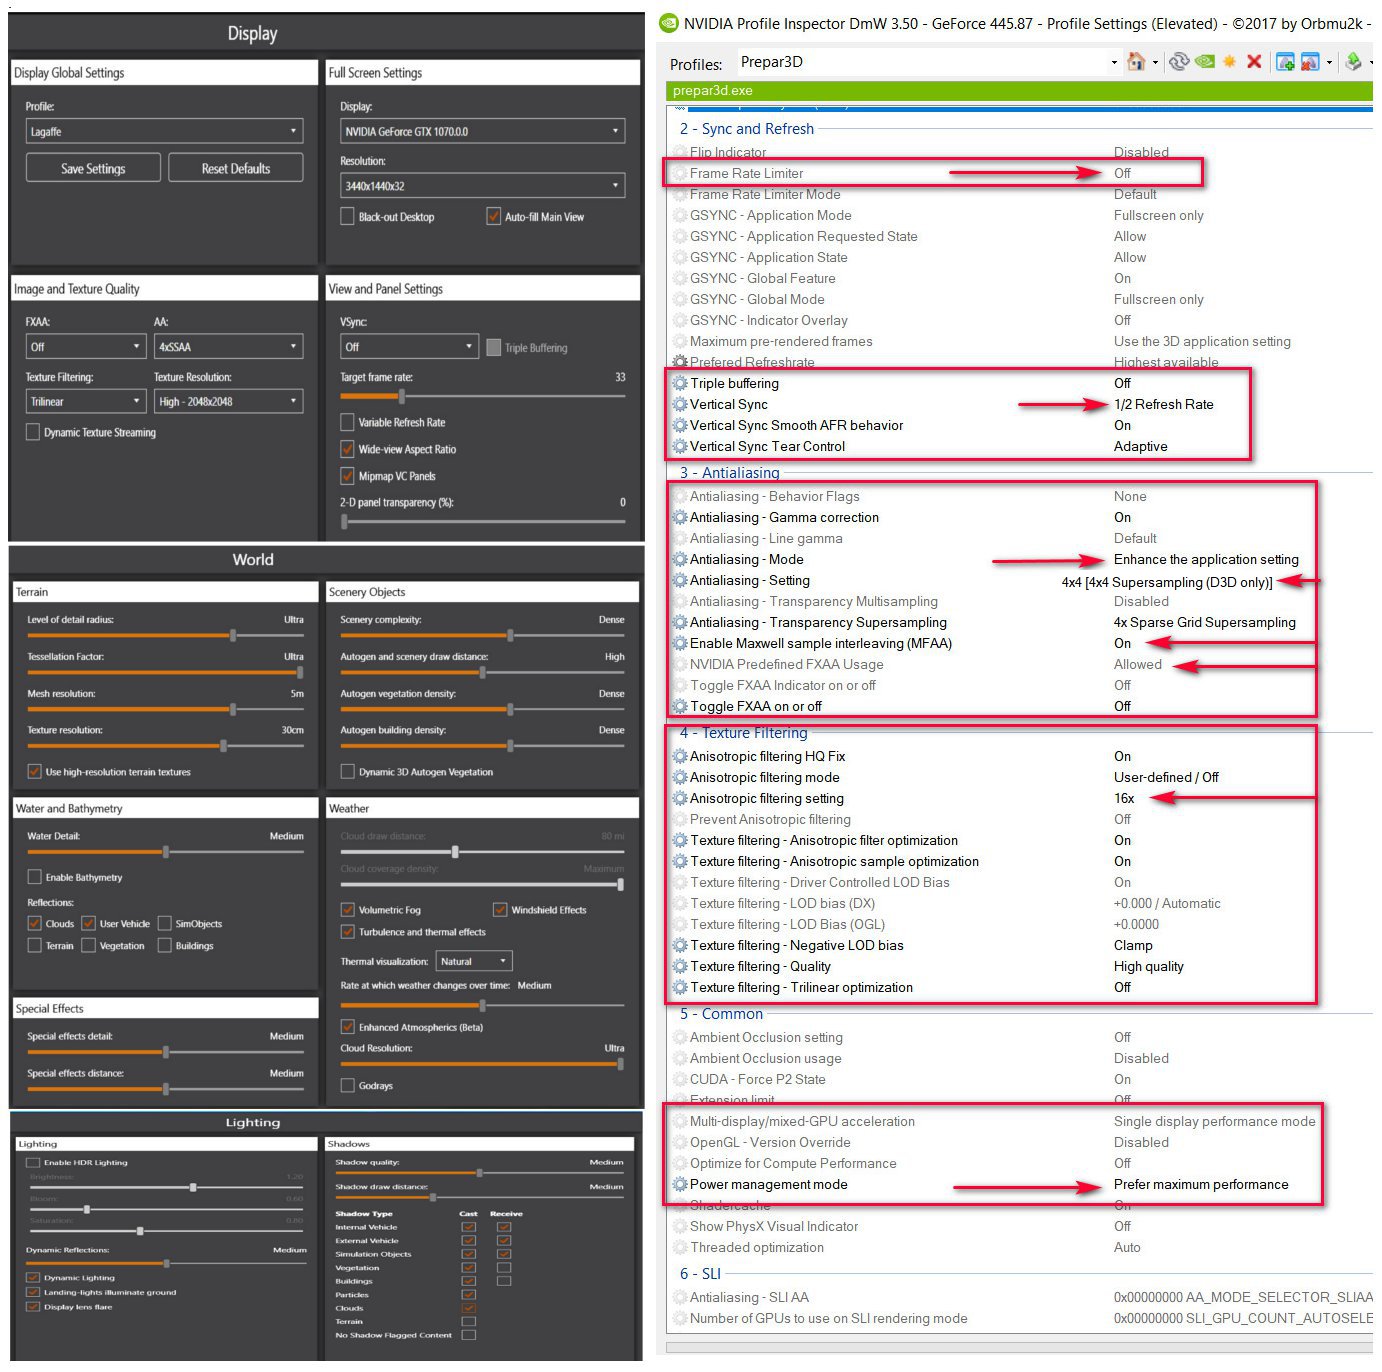
- Et dans nvidia inspector :
Antialiasing - Behavior flags : Treat 'Override any application setting' as 'Enhance the application setting'
Antialiasing - Mode : Enhance the application setting
Antialiasing - Setting : 8xSQ [Combined: 2x2 SS + 2x MS]
Hors ligne
#12 [↑][↓] 27-08-2013 17:03:31
- Ptipilot
- Commandant de bord

- Lieu: LFPT
- Date d'inscription: 18-03-2008
Re: [FSX] Directx 10, ENB Series, reglage carte graphique !!!
Bonjour,
Je vous lis avec attention et une petite question me brule les lèvres avant d'essayer dutiliser SweetFX :
Est ce qu'avec ce produit je peux continuer à utiliser plusieurs écrans (2 ou plus...).
Merci pour le retour...
J'avoue n'avoir pas cherché la réponse ailleurs!...
A+
Alain
Hors ligne
#13 [↑][↓] 28-08-2013 13:59:43
Re: [FSX] Directx 10, ENB Series, reglage carte graphique !!!
Bonjour j'ai une petite question encore :)
je voulais vous demander si ma carte graphique est assez puissante c'est une Nvidia GT630 de 2GB
je vous demande ça car vous m'aviez dit que les avions ou objet blanc sont du à une non compatibilité de DX10, tout à l'heure je me suis poser à Zurich j'ai vue un A340-600 de Thaï garer, il avait toutes ses couleurs, je continue mon roulage je tourne la tête pour le regarder à nouveau, pouf il était tout blanc donc je me suis dit si c'est pas compatible il serait blanc depuis le début non ?
Merci d'avance !!!
Hors ligne
#15 [↑][↓] 30-08-2013 19:36:31


Re: [FSX] Directx 10, ENB Series, reglage carte graphique !!!
Les gamme 6xx sont compatibles DX10 pas de soucis mais en dessous de 65x le GPU est assez faiblard pour FSX, pour FS9 je ne dis pas mais FSX ...
La gamme NVidia est assez simple pour FSX (cela valait aussi pour les 5XX ou les 4xx) :
bas de gamme de 6xx à 630
moyen gamme de 640 à 660
haut de gamme au-dessus de 670
@+ Didier
W10 Pro 64b Build 22H2 - Boitier HAF 932 - Z390 STRIX-F - 9900K - 2x16 Go - NVidia 3060 Ti 8 Go - Alim Corsair 800W - Ecran 34" - NVidia Studio ready 536.23
P3D v5.4 = http://www.pilote-virtuel.com/img/membe … ages-A.jpg - MSFS Deluxe/STORE - X-Plane 12B
Hors ligne
#16 [↑][↓] 30-08-2013 20:36:26
Re: [FSX] Directx 10, ENB Series, reglage carte graphique !!!
D'accord donc cela répond bien à ma question car je viens deffectuer un vol LFBO-LFPG et en arrivant les bâtiments de CDG était blanc alors que quand je part de CDG, pas de soucis les couleur sont bien la :(
Merci
Hors ligne
#17 [↑][↓] 01-10-2014 10:26:36
Re: [FSX] Directx 10, ENB Series, reglage carte graphique !!!
Quelqu'un aurait une solution alternative à SweetFX car il n'est pas compatible avec W8 et supérieur... En tout cas après avoir testé, et regardé sur des forums, on en conclu qu'il n'est pas compatible.
L'Aviation est la Preuve qu'avec de la Volonté, Nous Pouvons Accomplir l'Impossible.
Hors ligne
Pages: 1
- Accueil forums
- » Technique & Optimisation
- » [FSX] Directx 10, ENB Series, reglage carte graphique !!!